Difference between revisions of "Setting up MFA for Office 365"
Ben Pruyne (talk | contribs) (Changed Screenshots to remove identifying info.) |
Ben Pruyne (talk | contribs) m |
||
| (3 intermediate revisions by the same user not shown) | |||
| Line 3: | Line 3: | ||
=== Step 1. === | === Step 1. === | ||
If this is your '''first time signing into your email''' you should navigate to '''<nowiki>https://outlook.office365.com</nowiki>''' in a web-browser and sign in with the login information you were provided (You will most likely be prompted to set a new password). | |||
If you have an '''existing 365 account''' or if you've already signed into your account navigate to '''<nowiki>https://aka.ms/MFASetup</nowiki>''' in a web-browser, you may need to login again. | |||
After logging in you will be taken a page that looks similar to the example below. If you choose to skip you will still be forced to set up multi-factor authentication in 14 days so go ahead and click '''Next'''. | After logging in you will be taken a page that looks similar to the example below. If you choose to skip you will still be forced to set up multi-factor authentication in 14 days so go ahead and click '''Next'''. | ||
| Line 10: | Line 12: | ||
=== Step 2. === | === Step 2. === | ||
You will then be taken to a window similar to the example below. At this point you can go ahead and download the “Microsoft Authenticator” | You will then be taken to a window similar to the example below. At this point you can go ahead and download the '''“Microsoft Authenticator”''' | ||
application on your smartphone. Once it’s downloaded click '''Next''' on this window and then '''Next''' on the following window. | application on your smartphone. Once it’s downloaded click '''Next''' on this window and then '''Next''' on the following window. | ||
[[File:365MFASetup2.png|border|frameless|556x556px]] | [[File:365MFASetup2.png|border|frameless|556x556px]] | ||
click next on the window below as well... | |||
[[File:MFASetupSS.png|border|frameless|556x556px]] | |||
=== Step 3. === | === Step 3. === | ||
You now be at | You should now be at a window similar to the example below. If you are, keep this window open. | ||
Open the Microsoft Authenticator app on your smartphone and proceed to the next step. | Open the Microsoft Authenticator app on your smartphone and proceed to the next step. | ||
Latest revision as of 13:20, 19 May 2023
How to setup multifactor authentication (MFA) for your new 365 account
This article will guide you through the steps for setting up MFA so that you can log into your new 365 email account.
Step 1.
If this is your first time signing into your email you should navigate to https://outlook.office365.com in a web-browser and sign in with the login information you were provided (You will most likely be prompted to set a new password).
If you have an existing 365 account or if you've already signed into your account navigate to https://aka.ms/MFASetup in a web-browser, you may need to login again.
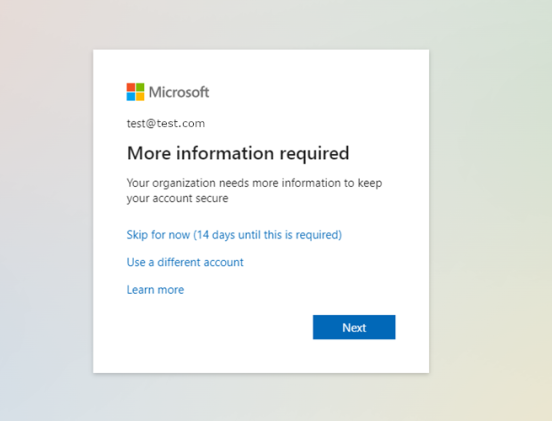
After logging in you will be taken a page that looks similar to the example below. If you choose to skip you will still be forced to set up multi-factor authentication in 14 days so go ahead and click Next.
Step 2.
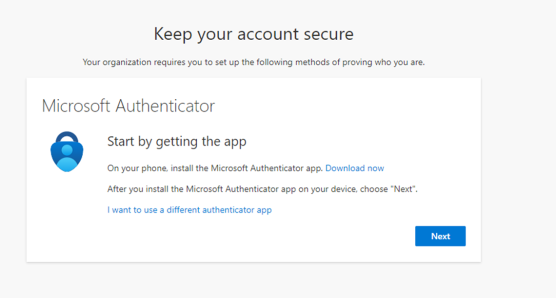
You will then be taken to a window similar to the example below. At this point you can go ahead and download the “Microsoft Authenticator”
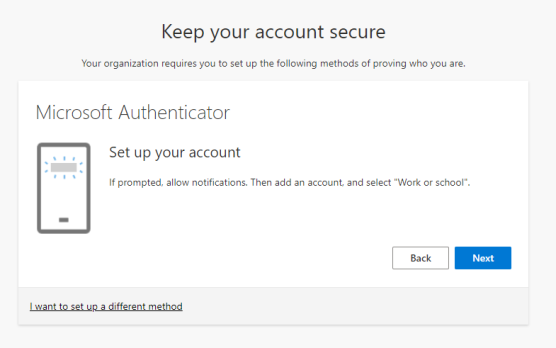
application on your smartphone. Once it’s downloaded click Next on this window and then Next on the following window.
click next on the window below as well...
Step 3.
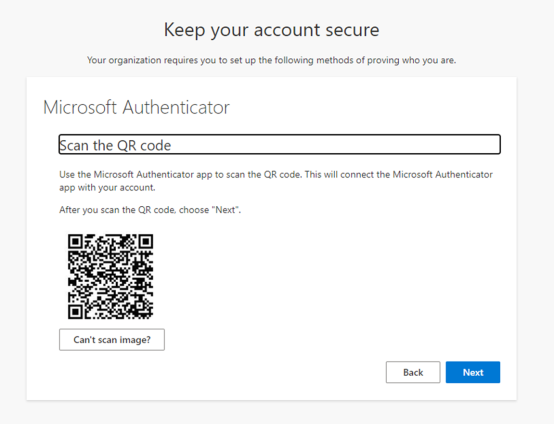
You should now be at a window similar to the example below. If you are, keep this window open.
Open the Microsoft Authenticator app on your smartphone and proceed to the next step.
Step 4.
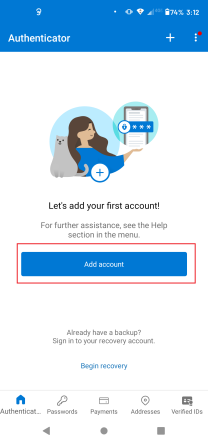
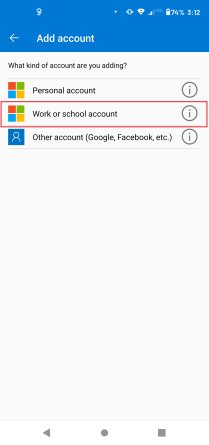
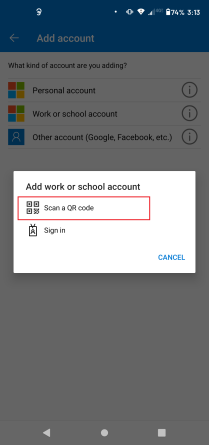
Once you have Microsoft Authenticator app open choose: Add Account then Work or School Account and then Scan a QR Code.
This will open the camera on your phone. Go ahead and scan the QR code that's should still be up on your monitor.
Step 5.
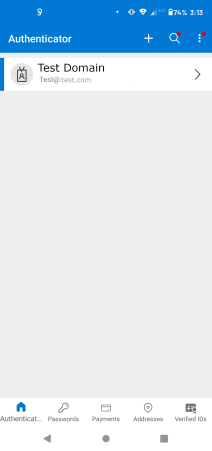
Once you have scanned the QR code, your Microsoft Authenticator app should look similar to the example below. If it does, then go ahead and
click Next on the browser window with the QR code.
Step 6.
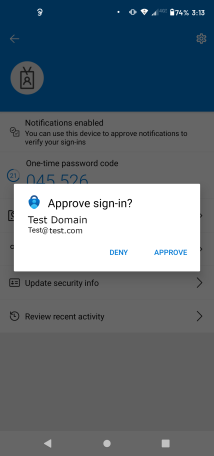
As soon as you click Next the website will send a prompt to your cellphone via the Microsoft Authenticator app that looks like the example below.
Go ahead and choose Approve. After approving the sign in on your phone you should successfully be logged into your Outlook email. You now have
the extra security of MFA. You will be prompted to approve in the same way on your smartphone every 14 days or if you sign in on any new devices.
